This post was updated 1391 days ago and some of the ideas may be out of date.
 用的firefox浏览器,但是原生的新标签页自定义不支持添加背景图片。相比之下,chrome和edge都支持给新标签页自定义背景图片。因此我研究了一下,在superuser上找到了修改新标签页背景图片的方法。

不过直接使用这里面的CSS的效果并不好,所以我修改了一下CSS,在图片上叠加了一层半透明黑色的径向渐变,以降低其亮度,使页面看起来更美观,还把火狐的logo给去掉了……效果如图。

步骤
一、在地址栏进输入about:profiles 回车访问。打开默认配置文件的根目录。
点击图片中这个配置文件下面的根目录旁边的打开文件夹

二、在这个目录下新建一个名为 chrome 的文件夹(说起来居然要起名为chrome啊……)

三、将背景图片放入新建的 chrome 文件夹中,并新建文本文件,重命名为 userContent.css


这里只需要一张图片就?了
四、修改 userContent.css 的内容并保存。注意这里面的 img.jpg 要替换成你的背景图片的文件名……
@-moz-document url(about:home), url(about:newtab), url(about:privatebrowsing) {
    .top-site-button .title, .context-menu-button {
        color: #fff !important ;
        text-shadow: 2px 2px 2px #222 !important ;
    }

    .logo-and-wordmark {
        display: none !important;
    }

    body {
        --newtab-topsites-outer-card-hover:rgba(255, 255, 255, 0.4) !important;
        --newtab-element-hover-color: rgba(255, 255, 255, 0.3) !important;
    }

    body::before {
        content: "" ;
        z-index: -1 ;
        position: fixed ;
        top: 0 ;
        left: 0 ;
        background:radial-gradient(rgba(255, 255, 255, 0), rgba(0, 0, 0, 0.75)), no-repeat url(img.jpg) center ;
        background-size: cover ;
        width: 100vw ;
        height: 100vh ;
    }
}
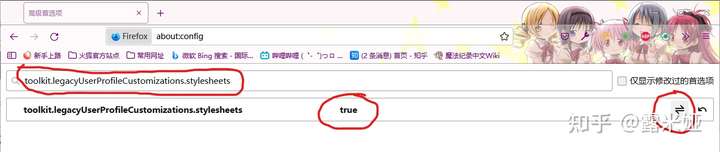
五、访问about:config,搜索toolkit.legacyUserProfileCustomizations.stylesheets并将其改为 true


六、重启firefox即可。
css的解释
    .top-site-button .title, .context-menu-button {
        color: #fff !important ;
        text-shadow: 2px 2px 2px #222 !important ;
    }
这一段用来将字体颜色改为白色
    .logo-and-wordmark {
        display: none !important;
    }
这一段用来移除logo
    body {
        --newtab-topsites-outer-card-hover:rgba(255, 255, 255, 0.4) !important;
        --newtab-element-hover-color: rgba(255, 255, 255, 0.3) !important;
    }
这一段修改了当鼠标移动到网页图标上时显示的方框的颜色,如图
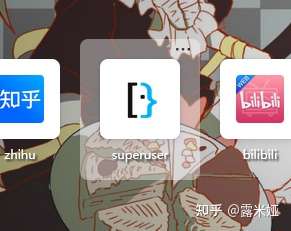
颜色变成了半透明的白色
    body::before {
        content: "" ;
        z-index: -1 ;
        position: fixed ;
        top: 0 ;
        left: 0 ;
        background:radial-gradient(rgba(255, 255, 255, 0), rgba(0, 0, 0, 0.75)), no-repeat url(img.jpg) center ;
        background-size: cover ;
        width: 100vw ;
        height: 100vh ;
    }
这一段就是修改背景图片啦
radial-gradient(rgba(255, 255, 255, 0), rgba(0, 0, 0, 0.75))在图片上叠加了一个中心渐变,不然原图是要亮很多的,图片太花了会导致看不清前面的网页按钮
吐槽
作为写后端的,完全不擅长用F12调试工具……
修改的CSS没有生效怎么办? !important一把梭!
只要在自己的默认配置文件的目录下修改就行;
(配置文件夹:“dev-edition-default”,或者“default-release-1”,每个用户的名称可能不同?)
此外推荐个插件更加美观
火狐浏览器新标签页自定义美化
点击这个链接安装即可


等等一系列自定义功能

参与讨论